Java 내용 총 정리
1. 변수 선언
: 자료형type 변수이름; 변수명은 '카멜 케이스(camelCase)'라는 기법으로 작성
2. 자료형
- TypeBitsRange of Values
| byte | 8bits | -2^7 ~ 2^7-1 (-128 ~ 127) |
| short | 16bits | -2^15 ~ 2^15-1 (-32768 ~ 32767) |
| int | 32bits | -2^31 ~ 2^31-1 (-2147483648 ~ 2147483647) |
| long | 64bits | -2^63 ~ 2^63-1 (-9223372036854775808 ~ 9223372036854775807) |
| float | 32bits | *single-precision 32-bit IEEE 754 floating point |
| double | 64bits | *double-precision 64-bit IEEE 754 floating point |
| char | 16bits | \u0000 ~ \uffff (0 ~ 2^15-1) |
| boolean | *VMD | true, false |
- 자료형 기본값
| byte | 0 |
| short | 0 |
| int | 0 |
| long | 0L |
| float | 0.0f |
| double | 0.0d |
| char | '\u0000' |
| boolean | false |
- Escape SequenceDescription
| \t | 탭 |
| \b | 백스페이스 |
| \n | 줄 바꿈 (new line) |
| \r | 줄 바꿈 (carriage return) |
| \f | 폼 피드(form feed) |
| ' | 작은 따옴표 |
| " | 큰 따옴표 |
| \ | 역슬래쉬 |
- 숫자형 리터럴 표기법
long e = 123;
long f = 123L;   // long의 리터럴 표현방법

float g = 3.14;  // 오류: 형이 맞지 않음. 필요한 값: float, 발견된 값: double
float h = 3.14f; // float의 리터럴 표현방법
float i = 314f;  // float의 리터럴 표현방법

double j = 3.14;
double k = 314d; // double의 리터럴 표현 방법
- 강제 형변환
double b = (double) a;
long c = (long) a;

int a = 9, b = 5;
System.out.println(a / b);
=> 1

System.out.println((double) a / b);
=> 1.8
printf() 출력 형식
- printf("%[-][0][n][.m]지시자",변수)
n : 출력할 전체 자리수 지정(오른쪽 정렬).  예) %3d, 전체자리수가 3인 정수
0 : 전체 자리수가 지정된 경우 왼쪽의 남는 자리에 0을 출력.  예) %03d
- : 전체 자리수가 지정된 경우 왼쪽 정렬하고 빈칸에 공백 출력.
.m : 소수점 아래 자리수 지정. 잘리는 소수점 자리수는 반올림 시켜서 표시. 예)3.2f| 지시자 | 설명 |
| %b | boolean 형식으로 출력 |
| %d | 정수 형식으로 출력 |
| %o | 8진수 정수의 형식으로 출력 |
| %x 또는 %X | 16진수 정수의 형식으로 출력 |
| %f | 소수점 형식으로 출력 |
| %c | 문자형식으로 출력 |
| %s | 문자열 형식으로 출력 |
| %n | 줄바꿈 기능 |
| %e 또는 %E | 지수 표현식의 형식으로 출력 |
String candy = "사탕";
int price = 300;

System.out.printf("%s는 가격이 %d만원 입니다.%n",candy,price);
=> 사탕은 가격이 300만원 입니다.
- 소수점 출력
  float f = 1.2345f;

  //소수점 자리수 미지정
  System.out.printf("%f%n",f);
=> 1.234500

  //소수점 자리 지정시
  System.out.printf("%.3f%n",f);
 => 1.235
- printf 자리수 출력
  //자리수 지정은 안 했을 경우 왼쪽으로 정렬된다.
  System.out.printf("%d%n",1);
  System.out.printf("%d%n",10);
  System.out.printf("%d%n",100);
  System.out.printf("%d%n",1000);

  1
  10
  100
  1000

  //자리수 지정했을 경우 오른쪽으로 정렬된다.(남는 자리수는 공백)
  System.out.printf("%4d%n",1);
  System.out.printf("%4d%n",10);
  System.out.printf("%4d%n",100);
  System.out.printf("%4d%n",1000);

  1
  10
  100
  1000

  //자리수 지정 후 '-'사용하면 왼쪽으로 정렬된다.
  System.out.printf("%-4d%n",1);
  System.out.printf("%-4d%n",10);
  System.out.printf("%-4d%n",100);
  System.out.printf("%-4d%n",1000);

  1
  10
  100
  1000

  //자리수 지정 후 '0'사용하면 오른쪽으로 정렬된다. (왼쪽 자리수는 0으로 채운다)
  System.out.printf("%04d%n",1);
  System.out.printf("%04d%n",10);
  System.out.printf("%04d%n",100);
  System.out.printf("%04d%n",1000);

  0001
  0010
  0100
  1000
switch/반복문/Array배열
- switch 스위치문 형식
switch (score / 10) {
    case 10:
        grade = "A+";
        break;
    case 9:
        grade = "A";
        break;
    default:
        grade = "F";
        break;
}
- while 반복문 문법
while (조건 부분) {
  수행 부분
}
- for 반복문 문법
for (int i = 1; i <= 10; i++) {
    System.out.println(i);
}
- array 선언 및 초기화
//크기 할당 & 초기화 없이 배열 참조변수만 선언
int[] arr;
int arr[];

// 선언과 동시에 배열 크기 할당
int[] arr = new int[5];
String[] arr = new String[5];

// 기존 배열의 참조 변수에 초기화 할당하기
int[] arr;
arr = new int[5]; //5의 크기를 가지고 초기값 0으로 채워진 배열 생성

// 선언과 동시에 배열의 크기 지정 및 값 초기화
int[] arr = {1,2,3,4,5};
int[] arr = new int[]  {1,3,5,2,4};
int[] odds = {1,3,5,7,9};
String[] weeks = {"월","화","수","목","금","토","일"};

// 2차원 배열 선언
int[][] arr = new int[4][3];   //3의 크기의 배열을 4개 가질 수 있는 2차원 배열 할당
int[][] arr9 = { {2, 5, 3}, {4, 4, 1}, {1, 7, 3}, {3, 4, 5}};
//arr[0] >> {2, 5, 3};
//arr[1] >> {4, 4, 1};
//arr[2] >> {1, 7, 3};
//arr[3] >> {3, 4, 5};
- array 와 for 문
int[] arr = {1,2,3,4,5};
for(int i = 0; i < arr.length; i++) {
       System.out.println(arr[i]);
}
for(int number : arr) {
       System.out.println(number);
}
- 다중배열 생성과 입력
int[][] multiArray = {
    {1, 2, 3, 4},
    {5, 6, 7, 8},
    {9, 10, 11, 12}
};

int[][] multiArray = new int[3][4];

for (int i = 0; i < multiArray.length; i++) {
    for (int j = 0; j < multiArray[i].length; j++) {
        multiArray[i][j] = (i * 4 + 1) + j;
    }
}
콘솔입력 Scanner
Scanner 입력 -> 자동완성 엔터(자동 import 된다)
Scanner scanner = new Scanner(System.in);
int age = scanner.nextInt();

System.out.println("나이는: " + age);

System.out.println("이름이 어떻게 되시나요?? ");
String name = scanner.next();

System.out.println(name +"의 나이는 "+ age)
abstract/ interface 추상클래스,인터페이스 차이
- 인터페이스 interface
- 구현하려는 객체의 동작의 명세
- 다중 상속 가능
- implements를 이용하여 구현
- 메소드 시그니처(이름, 파라미터, 리턴 타입)에 대한 선언만 가능
- 추상클래스 abstract
- 클래스를 상속받아 이용 및 확장을 위함
- 다중 상속 불가능 , 단일 상속
- extends를 이용하여 구현
- 추상메소드에 대한 구현 가능
** 추상메소드는 설계만 되어있으며 수행되는 코드에 대해서는 작성이 안된 메소드입니다.
- 이처럼, 미완성으로 남겨두는 이유는 상속받는 클래스 마다 반드시 동작이 달라지는 경우에 상속받는 클래스 작성자가 반드시 작성하도록하기 위함이다.
List 내용 정리
: List는 순서가 나열된 데이터의 모음
ArrayList는 배열을 이용하여 데이터를 저장하는 list 인터페이스이다.
- List 선언 및 .add()/.remove() 삽입, 제거
List<Integer> integerList = new ArrayList<>();
integerList.add(1);
integerList.add(5);
integerList.add(4);
integerList.add(10);
integerList.add(11);
>> [1,5,4,10,11]
integerList.remove(4);
>> [1,5,4,10]- Collections.sort() 로 오름차순 정렬
Collections.sort(integerList);
>> [1,4,5,10]- 출력 방식 2가지
# 방법-1
for(int i = 0 ; i<integerList.size();i++){
System.out.println(integerList.get(i));
}
# 방법-2
for(int current: integerList){
System.out.println(current);
}
Set 내용 정리
: 순서를 유지하지 않고 데이터의 중복이 없는 데이터의 집합. (파이썬의 딕셔너리)
HashSet은 Set인터페이스를 구현한 대표적인 컬렉션이다.
- Set 선언 및 .add()/.remove() 삽입, 제거
 # Collection의 자료형에는 primitive 타입은 올 수 없습니다.
 # primitive 타입에 해당하는 class 가 존재하니 그것을 사용하세요.
 Set<Integer> integerSet = new HashSet<>();
 integerSet.add(1);
 integerSet.add(3);
 integerSet.add(2);
 integerSet.add(9);
 >> [2,3,9,1]    # 순서가 지켜지지 않는다.

# remove()에는 index가 아닌 지울 요소를 직접 입력한다.
 integerSet.remove(3);
>> [2,9,1]- 한번에 여러개 제거
Set<String> stringSet = new HashSet<>();
stringSet.add("LA");
stringSet.add("New York");
stringSet.add("LasVegas");
>> ["LA","New York","LasVegas"]
ArrayList<String> target = new ArrayList<String>();
target.add("New York");
target.add("LasVegas");//제거할 항목을 ArrayList에 삽입하겠습니다.
stringSet.removeAll(target);//제거항목에 삽입된 도시들을 삭제하겠습니다.
>> ["LA"]

stringSet.clear();//HashSet의 모든 아이템들을 삭제합니다.
>> []- set 안에 요소가 있는지 확인 true/false 리턴
["LA"]
stringSet.contains("LA")
>> true
stringSet.contains("Busan")
>> false- HashSet의 크기 리턴
 ["LA"]
 stringSet.size()
 >> 1
Map 내용 정리
: HashMap은 키(key)와 값(value)을 하나의 데이터로 저장하는 특징을 가진다.
이를 통하여 해싱(hashing)을 가능하게 하여 데이터를 검색하는데 뛰어난 성능을 보인다.
- Map 선언 및 삽입, 제거
Map<Integer, String> map = new HashMap<>();
map.put(1, "apple");
map.put(2, "berry");
map.put(3, "cherry");
>> {1=apple, 2=berry, 3=cherry}

# index가 아닌 요소를 직접 제거한다
map.remove(2);
>> {1=apple, 3=cherry}

# 다 지우기
map.clear();
>> {}
- 요소가 들었는지 확인
map.containsKey(2) / map.containsValue("cherry")
# key 값 확인
map.containsKey(2)
System.out.println(map.containsKey(2));
>> false

# Value 값 확인
.containsValue("cherry")
System.out.println(map.containsValue("cherry"));
>> true
Stack 스택
: 스택은 마지막에 저장한 데이터를 가장 먼저 꺼내는 자료구조. LIFO(Last In First Out)
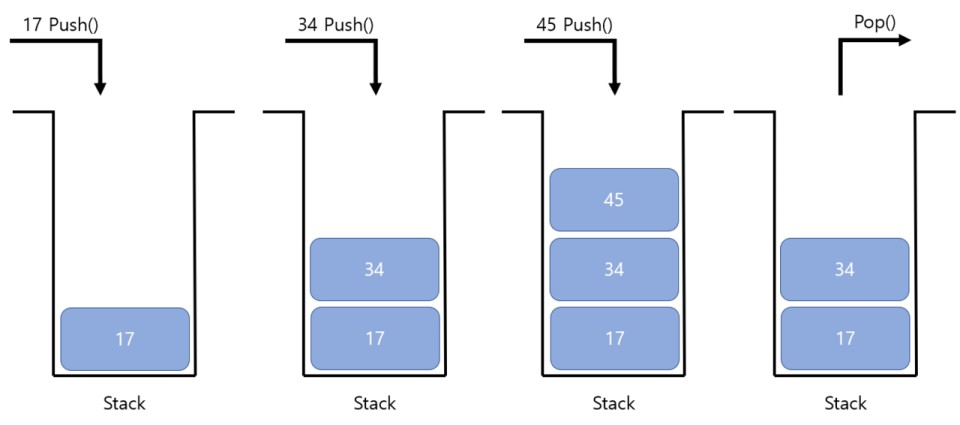
| .push() | 스택을 쌓는다. 뒤에 붙임 [1] -> [1, 3] -> [1, 3, 5] |
| .peek() | 맨 오른쪽(맨 위) 값을 반환 |
| .size() | 스택의 크기를 반환 |
| .contains() | 값이 들었으면 true / 없으면 false |
| .empty() | 스택이 비었으면 true / 안비었으면 false |
Stack<Integer> stack = new Stack<>();
stack.push(1);
stack.push(3);
stack.push(5);
stack.push(7);
>> [1, 3, 5, 7]

// Stack의 가장 상단 값을 출력합니다.(삭제는 하지 않습니다.)
System.out.println(stack.peek());
>> 7

stack.pop(); // Stack의 가장 상단 값을 제거합니다.
>> [1,3,5]

System.out.println(stack.size()); // Stack의 크기를 반환합니다.
>> 3

System.out.println(stack.contains(1)); // Stack에 1이라는 값이 있으면 true/없으면 false
>> true

System.out.println(stack.empty()); // Stack이 비어있으면 true/ 없으면 false
>> false
Queue 큐
- 큐는 처음에 저장한 데이터를 가장 먼저 꺼내는 FIFO(First In First Out) 구조.

스택과 다른 .poll() 은 맨 좌측 값을 꺼내서 반환한다., 그 외엔 같다.
Queue<Integer> queue = new LinkedList<>();
queue.add(1);
queue.add(3);
queue.add(5);//Queue에 값 삽입합니다.
>> [1, 3, 5]

System.out.println(queue.poll()); // Queue에서 객체를 꺼내서 반환합니다.
>> 1   [3,5]

System.out.println(queue.peek()); //Queue에서 삭제 없이 요소를 반환합니다.
>> 3  [3,5]
}
- deque , ArrayDeque
: ArrayDeque는 실무에서는 단순히 Stack, Queue 클래스 대신에 ArrayDeque 많이 사용한다.
기본 Stack, Queue의 기능을 모두 포함하면서도 성능이 더 좋다.
  ArrayDeque<Integer> arrayDeque = new ArrayDeque<>(); // ArrayDeque를 이용한 선언(제네릭스 이용)
  arrayDeque.addFirst(1);
  arrayDeque.addFirst(2);
  arrayDeque.addFirst(3);
  arrayDeque.addFirst(4); // arrayDeque의 앞에 값을 삽입
  System.out.println(arrayDeque);

  arrayDeque.addLast(0); // arrayDeque의 끝에 값을 삽입
  System.out.println(arrayDeque);

  arrayDeque.offerFirst(10); // addFirst와 비슷하지만 큐의 크기 문제가 생길 때, offerFirst는 false를,
  // addFrist는 exception을 반환합니다.
  System.out.println(arrayDeque);

  arrayDeque.offerLast(-1); // arrayDeque의 끝에 값을 삽입
  System.out.println(arrayDeque);
  System.out.println(arrayDeque.size()); // 7


  System.out.println(arrayDeque.removeFirst()); // 첫번째 값을 제거하면서 그 값을 리턴
  System.out.println(arrayDeque.removeLast()); // 마지막 값을 제거하면서 그 값을 리턴
  System.out.println(arrayDeque);
  System.out.println(arrayDeque.size()); // 5

  System.out.println(arrayDeque.pollFirst()); // 첫번째 값을 반환 및 제거하면서 그 값을 리턴
  System.out.println(arrayDeque);
  System.out.println(arrayDeque.size()); // 4

  System.out.println(arrayDeque.pollLast()); // 마지막 값을 반환 및 제거하면서 그 값을 리턴
  System.out.println(arrayDeque);
  System.out.println(arrayDeque.size()); // 3

  System.out.println(arrayDeque.peekFirst()); // 첫번째 값을 반환, 제거하지 않음
  System.out.println(arrayDeque.peekLast()); // 마지막 값을 반환, 제거하지 않음
  System.out.println(arrayDeque.size()); // 3
  }

이미지 출처
'Java, IntelliJ > JAVA' 카테고리의 다른 글
| Java split, substring 문자열 자르기 (0) | 2021.06.24 |
|---|---|
| JAVA 별찍기 문제 (0) | 2021.06.24 |
| JAVA Class 클래스 정리 (0) | 2021.06.24 |
| Java, intelliJ 문법 정리 (0) | 2021.06.05 |
| [Java] IntelliJ IDEA 자주 쓰는 단축키 모음, 단축구문 모음 (0) | 2021.06.03 |
댓글